Recent Updates Page 17 RSS Toggle Comment Threads | Keyboard Shortcuts
-
VennerCorp
-
VennerCorp
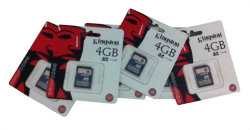
How Do I Clone An SD Card?
Below are some easy and straight forward instructions to clone your SD card.
The below instructions assume you are using a windows based machine and use a great little utility called HDD-Raw-Copy-Tool this can be used to create an exact low-level, sector-by-sector device duplication you can clone SATA, IDE, SAS, SCSI, SSD drives, USB sticks, SD, MMC and CompactFlash cards to an img file or to another device..
Clone your SD card
- Download the utility from http://hddguru.com/software/HDD-Raw-Copy-Tool/.
- We would recommend you get the standalone version as this means you don’t need to install the program and will run straight from the download.
- Pop your SD card into your PC or laptop.
- Start up the program.
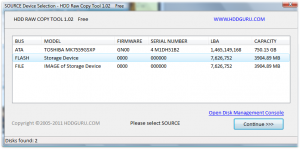
- Highlight your SD card and click continue (the card you want to copy).
- Highlight the device you want to copy to, or select if you want to write to an image file.
- If you want to write to an image file to copy to a SD card at a later date – Double click on the FILE option and choose the location and name for your image file.
- Click Continue.
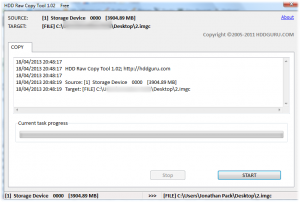
- You will now get a display showing your previous choices, check them and then double check them – If you write to the wrong drive e.g. Yo
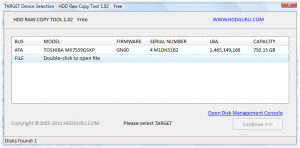 ur main hard disk your computer will be very poorly!!
 - Click start.
- The program will now clone your SD card.
That is it, you now have a clone or an img file of your SD card. If you created an image file this can now be used to make multiple clones.
To go the opposite way e.g. Burn an image to SD, choose an image file in t
 he first window and then an SD card in the second.
If you would like to check out some of our useful Utilities please visit our Internet Utilities page.
If you would like help with your computer or laptop then please contact us or visit our IT Support Page.
- Download the utility from http://hddguru.com/software/HDD-Raw-Copy-Tool/.
-
VennerCorp
Business Website Design in Guildford
We are a small friendly and professional business offering a full range of IT services including Website Design and Creation, Website Updates and Modernisation, Website Consultancy and Search Engine Optimisation.
Website Design and Creation
Looking for a new website for your business, club or society? We offer a full range of website complexities and designs from simple single page holder pages, to multi page product brochure websites sites, all the way to full blow E-Commerce online shops. All our designs are custom made to your specification, we do not use templates or outsource our work. We can also purchase and setup any domain names and web hosting you may need.
Website Update and modernisation
Is your site looking a bit tired or old fashioned? Is your site not bringing in the types of results you and your business need? We can bring your site up to date, adding all the features a user expects from a modern website. Including recording and uploading videos and integration with social networks. We can also optimise your website to stop it languishing in the search engine results.
Social Networks
Do social networks confuse and baffle you? Or your not sure how to use them to get the most from your business? We can talk you though all the ins and outs of the the popular networks and integrate them into your website. If you don’t have the time to deal with them yourself we can even set them up and run them on your behalf.
 Our Business Website Design Services;
- Website Design and Creation.
- E-commerce Website Creation.
- Website Updates and Modernisation.
- Search Engine Optimisation.
- Website Hosting.
- Website Domain Registration.
- Online Database Creation.
- Online Software Creation.
- Social Networks
- Twitter and Facebook Account Creation.
- Integration Of Social Networks To Your Site.
- Consultancy On How To Get The Most From Social Networks.
- Online advertising on Google, Bing ,Yahoo;
- Setup and Running.
- Consultancy.
- Online videos;
- Creation and Setup.
- Website Integration.
The above list is not exhaustive, if you don’t see the service you require please still drop us a line as we can normally still help.
Examples
If you would like to view a small selection of the websites we have created for our clients, check out our website samples page.
Coverage areas
The majority of our customers are in the Guildford to Windsor corridor including, Ascot, Sunningdale, Chobham, Camberley, Woking, Knaphill, Dorking and Godalming, but we have customers all over the world, so if you are outside this area please still contact us.
If you would like more information on our services or arrange a quote please contact us and or visit our Website Design and Creation section.
-
VennerCorp
How Do I Install Open Elec To My Raspberry PI?
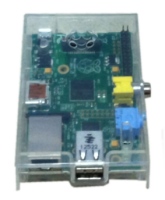
OpenELEC is an embedded version of the Open Source media center software XBMC that has been designed to run like any other set top box you connect to your TV like a DVD player or PVR.
It is a great piece of software to get running on your PI, you will wonder how you ever lived with out it.
Follow the below instruction to get Open Elec Running on your PI
- Get an SD card 2GB minimum.
- Pop it into your PC/Laptop.
- Download the latest Openelec software image from http://resources.pichimney.com/OpenELEC/official_images/?C=M;O=D
- Download an image writer from http://www.roadkil.net/program.php?ProgramID=12&Action=NewOSID&DownloadVersion=4&Installer=NO
- Unzip the OpenELEC image and install the roadkill img writer.
- Use the roadkill to write the image file to your sd card.
- If you have any issues writing the image see the section below on how to wipe your SD card.
Wipe SD Card
If you have an SD card that has been used before you might have issues writing the OpenElec image file to it with out clearing out any partitions first, follow the instructions in out recent post below.
Insert your SD card into your Pi and power up.
That is it, Openelec should now be running on your PI.
If you don’t get the green activity LED light flashing on your PI then it means there is an issue with the SD card or the image you have just written – try redoing it.
Now your Pi is running you might want to do some of the following things.
- Setup Wifi on your PI –
- Add an Mpeg2 license –
- Change the default skin –
- Add additional Add ons –
For more Tutorials and Hints & Tips on the Raspberry PI check out our Raspberry PI Blog Section
If you would like to Buy a Raspberry PI, its accessories or software check out our –
If you would like help with your Raspberry PI, computer or laptop then please contact us or visit our IT Support Page.
- Get an SD card 2GB minimum.
-
VennerCorp
Computer Services Guildford
We offer a friendly and professional service to both business and residential customers, our clients range from small one man bands to large international company’s including;
- Medical Clinics
 .
. - Surgery’s.
- Shops.
- Offices.
- Restaurants.
- Pubs.
- Schools.
- Nursery.
- Garden Centres.
- and residential premises.
We provide a varied range of services from creating large e-commerce websites, setting up computer networks & servers to basic laptop / computer diagnostics and repairs.
Our Computer Services include;
- Website Design and creation.
- Website Consultancy.
- Search engine optimization.
- Custom Software and database creation.
- Computer and Network installation and setup.
- Computer and Laptop Repair.
- Audio and Video Installation and setup.
The above list is only a small selection of the types of service we offer, please contact us if what you require is not mentioned.
Our coverage area for onsite computer services includes Guildford, Woking, Godalming, Reigate, Bracknell, Windsor and Ascot areas – if you are just outside these areas then please still contact us as we can normally still help.
For more information on our computer services visit Our Website Design / Custom Software / Computer Network Installation or Audio & Video Pages or Contact Us
- Medical Clinics
-
VennerCorp
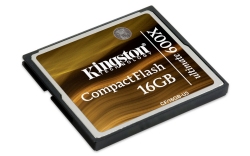
How Do I Clone A CompactFlash Card?
Below are some easy and straight forward instructions to clone your CompactFlash Card.
The below instructions assume you are using a windows based machine and use a great little utility called HDD-Raw-
Copy-Tool this can be used to create an exact low-level, sector-by-sector device duplication you can clone SATA, IDE, SAS, SCSI, SSD drives, USB sticks, SD, MMC and CompactFlash cards to an img file or to another device..
Clone your CompactFlash Card
- Download the utility from http://hddguru.com/software/HDD-Raw-Copy-Tool/.
- We would recommend you get the standalone version as this means you don’t need to install the program and will run straight from the download.
- Pop your CompactFlash card into your PC or laptop.
- Start up the program.

- Highlight your CompactFlash Card and click continue (the card you want to copy).
- Highlight the device you want to copy to, or select if you want to write to an image file.
- If you want to write to an image file to copy to a CompactFlash Card at a later date – Double click on the FILE option and choose the location and name for your image file.
- Click Continue.
- You will now get a display showing your previous choices, check them and then double check them – If you write to the wrong drive e.g. Yo
 ur main hard disk your computer will be very poorly!!
 - Click start.
- The program will now clone your CompactFlash Card.
That is it, you now have a clone or an img file of your CompactFlash card. If you created an image file this can now be used to make multiple clones.
To go the opposite way e.g. Burn an image to CompactFlash Card, choose an image file in t
 he first window and then an CompactFlash Card in the second.
If you would like to check out some of our useful Utilities please visit our Internet Utilities page.
If you would like help with your computer or laptop then please contact us or visit our IT Support Page.
- Download the utility from http://hddguru.com/software/HDD-Raw-Copy-Tool/.
-
VennerCorp
How do i change the Skin on OpenElec for my Raspberry PI?
Changing from the default Skin to a custom skin on your Raspberry Pi is actually fairly straight forward, just follow the instructions below.
You should be aware that some skins are more resource intensive than others and as you are probably aware the PI is not designed to be particularly powerful, so you should if possible keep the skin as simple as possible.
The Default skin is currently – Confluence.
- Plug in your leads and boot up your Pi.
- Navigate to SYSTEM > Settings > Appearance > Skin.

- Highlight and select “skin” on the right hand pane.
- A window will appear showing all the currently installed Skins on your Box.
- Click Get “Get More”
- A new window will appear showing a list of all the skins currently available on the XMBC servers.
- Move up and down the list and you will see a small preview with a description and rating appear on the right hand side.
- Once you have found the New Skin you would like to try highlight it and press enter / click.
- A new window will appear with various options select install.
- It will drop you back to the original list of skins, but you will now see a download percentage counter “Downloading 20%” next to your new chosen skin.
- When it has finished you will see the “Downloading 20%” become “enabled”.
- Drop back to the previous window or
-
- Navigate to SYSTEM > Settings > Appearance > Skin.
- Highlight and select “skin” on the right hand pane.
-
- You will now see your new skin next to “confluence” in the list – click on you new skin.
- A new window will pop up allowing you to customise it, i would suggest for now just leave it on the default settings until you get used to the new skin.
That is it, your new skin has been changed.
For more Tutorials and Hints & Tips on the Raspberry PI check out our Raspberry PI Blog Section
If you would like to Buy a Raspberry PI, its accessories or software check out our –
If you would like help with your Raspberry PI, computer or laptop then please contact us or visit our IT Support Page.
-
VennerCorp
How Do I Get F9 F10 F11 F12 On My RT-MWK01 Mini Keyboard?
The below instructions are applicable to the RT-MWK01 mini keyboard otherwise know as;
- 2.4GHz Ultra Mini Wireless Keyboard With Touchpad Presenter Combo
.
- Rii Mini.
- Wireless Mini Keyboard.
- This keyboard is also sold under various other different names on amazon.
It is actually very simple to get the extra missing function keys, you just need to use the blue FN (Function) key and then one of the numeric digit keys. e.g. if you wanted F9 you would press FN + 1.
Remember you must hold down the FN (Function) button while pressing the number digit.
If you would like to Buy a RT-MWK01 Mini Keyboard or Raspberry PI, its accessories or software check out our –
If you would like help with your computer or laptop then please contact us or visit our IT Support Page.
- 2.4GHz Ultra Mini Wireless Keyboard With Touchpad Presenter Combo
-
VennerCorp
How Do I add an MPEG-2 license key to my Raspberry PI?
Before purchasing your License from the raspberry pi shop you will need your Pi’s serial number. This is quite simple to do.
Get Your Raspberry PI Serial Number
- Boot UP your PI.
- Goto system > system info > network.
- Note your serial number – should be something like 000000000ffae29e.
Once you have your Serial number go to http://www.raspberrypi.com/mpeg-2-license-key/ fill in the form and pay your money. 2-3 days later you will get an email with your new License code.
In the email you will find a line similar to decode_MPEG2=0x7654321 the “0x7654321” is your License.
Add your License to your OpenElec / XMBC Installation
- Insert your SD card in to your PC or MAC etc.
- Open up your SD card in your file viewer of choice.
- Open config.txt.
- Scroll down until you find # decode_MPG2=0x00000000.
- Delete the #.
- Change the 0x00000000 to your new license.
- Click save.
- POP the SD card back in your PI and reboot.
Note – Some versions of XMBC have a field in their settings tab to allow you to input your license directly via the interface.
That’s it your job is done.
If you use multiple OS versions on multiple SD cards you will need to add the License to each.
Test your License
This process uses SSH, i would suggest you use a program called putty get it from http://www.chiark.greenend.org.uk/~sgtatham/putty/download.html
Default SSH username and password on openelec is username = root and password = openelec
Get your IP address from system > system info > network
- SSH into your Pi.
- Type “vcgencmd codec_enabled MPG2” without quotes.
You will then get either a MPG2=enabled or MPG2=disabled.
For more Tutorials and Hints & Tips on the Raspberry PI check out our Raspberry PI Blog Section
If you would like to Buy a Raspberry PI, its accessories or software check out our –
If you would like help with your Raspberry PI, computer or laptop then please contact us or visit our IT Support Page.
-
VennerCorp
How Do I Install Addons to Open Elec on My Raspberry PI?
How Do I Install Addons to OpenElec on My Raspberry PI?
There are some really good addons available for Openelec visit http://wiki.xbmc.org/index.php?title=Category:All_add-ons to look at all the standard addons that are available directly from within openelec.
Follow the below instruction to put the addons on to your raspberry PI
Your Pi must be able to connect to the internet in order to install the standard addons as they are pulled / downloaded directly.
Install Standard Addons
- Power up your PI
 .
. - Navigate to > Videos > Video Addon.
- Scroll down and find “Get More…” highlight it and press enter / left click.
- A list will appear, scroll or or down to find the add on you would like to install.
- Highlight it and press enter / left click.
- Find “..” highlight it and press enter / left click.
- A new window will appear giving you a bit more info on the Addon.
- Find the install button highlight it and press enter / left click.
- It will drop you back to the previous list, you will see a download % counter appear next to your chosen Addon.
- When it has finished you will see the Download % turn to “enabled”.
- That is it, the Addon is now installed.
- You can find the your new Addon in Videos > Video Add-ons.
The above will work for any Addon, just change the Video for music, program etc.
Add third party Add-ons.
- Search the internet for your desired addon e.g. BBC Iplayer.
- Download the addons Zip file e.g. iPlayer-v2.4.17.zip
- Save / Copy your ZIP file to a USB stick.
- Connect your USB stick to a spare USB port.
- Power up your PI.
- Navigate to > Videos > Video Add-ons.
- Scroll down and find “Get More…” highlight it and press enter / left click.
- Find “..” highlight it and press enter / left click.
- Find “..” highlight it and press enter / left click.
- Find “Install from Zip File” highlight it and press enter / left click.
- A new window will pop up – Find your USB stick highlight it and press enter / left click.
- If you can’t see your USB stick, pop it out and the pop it back in again.
- Navigate to your Addons ZIP file, highlight it and press enter / left click.
- You will now be dropped back to the “install from zip file” menu, wait a few seconds and an alert notice will pop up telling you your new Addon has been installed.
- You can find the your new Addon in Videos > Video Add-ons.
- If the Addon is not visible then exit the menu wait a few minutes and go back in, if it is still not visible after 5 minutes, you might need to reboot your PI.
The above will work for any Addon, just change the Video for music, program etc.
For more Tutorials and Hints & Tips on the Raspberry PI check out our Raspberry PI Blog Section
If you would like to Buy a Raspberry PI, its accessories or software check out our –
If you would like help with your Raspberry PI, computer or laptop then please contact us or visit our IT Support Page.
- Power up your PI


steve 17:30 on July 28, 2014 Permalink
i dont understand,dont you need 2 or both cf cards to clone info to other cf card?i want to clone a cf card with a software on it,,the software is magic lantern,it is a hack for digital cameras,the software needs to be on every cf card to be used on camera,it doesnt load to camera,it stays on card,so it would be easier to clone each card with the software on it.so,i dont understand what your doing here,,dont you need to have both card on the pc?cloning from or to each other?i would like to clone my card to many other cf cards.can this do it???
VennerCorp 12:33 on July 29, 2014 Permalink
You can use this software to create an ‘image’ of a CF card and then use that to burn multiple copies so you only need one to start with.