OpenELEC « VennerCorp Tech Blog
Website Design, Custom Computer Software, Computer and Network Installation & Computer Consultancy - Covering Hampshire, Surrey, Berkshire, GU24, Guildford, Woking, Bracknell, Staines, Sunningdale, Virgina Water & Wokingham

Cookies and your Privacy

0800 978 8326

Request a Quote Today!

Tagged: OpenELEC RSS

  • VennerCorp 19:19 on May 28, 2013 Permalink |
    Tags: , , OpenELEC,   

    Videos Keep Locking up During Playback on OpenELEC?

    Below are some hopefully fairly simple instructions to fix this problem.

    Quite often this problem is caused by using  a DHCP IP address e.g. OpenELEC is automatically getting an IP address from your router / Access point.

    The fix for this is quite simply swapping to a fixed IP address.

    For instructions check out our post on setting up a Fixed IP address on OpenELEC

    Videos Keep Locking up During Playback on OpenELEC?

    Videos Keep Locking up During Playback on OpenELEC?


    For more Tutorials and Hints & Tips on OpenELEC or the Raspberry PI check out our Raspberry PI Blog Section


    If you would like to Buy a Raspberry PI, its accessories or software check out our –


    If you would like help with your OpenELEC, Media Centre, Raspberry PI, computer or laptop then please contact us or visit our IT Support Page.


  • VennerCorp 20:05 on May 24, 2013 Permalink |
    Tags: , , OpenELEC,   

    How do I Setup a fixed IP on OpenELEC on my Raspberry Pi?

    Setting up a Fixed IP address on OpenELEC on your Raspberry Pi is actually fairly straight forward, but you will need to get some information before we start.

    1. You will need your Subnet Mask.
    2. The IP address of you router.
    3. The IP address of your ISP’s DNS servers.
    4. The IP range of your router / Access points DHCP server.
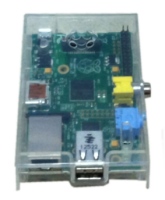
      Raspberry PI

    How to get the above information.

    There are a few ways to get this information, but the simplest is either via logging into your router and getting the information or from your installation of OpenELEC before you setup a fixed IP.

    Via OpenELEC

    • The below assumes you are connecting to your router correctly via DHCP e.g. everything works.
    • Navigate to SYSTEM > Sytem Info.
    • Move down the menu to Network and note the following items
      • IP address:
      • Subnet Mask:
      • Gateway:
    • The DHCP range and DNS servers will still need to be sourced from your router.

    Via your Router

    The actual method will depend on your router, but generally speaking once you have logged into your router you will need to find the status tab. This should give you the information you need.

    DNS Servers

    Within the routers status tab you should see DNS 1 & DNS 2 labels with IP addresses next to them (see sample below) these are the DNS servers you will need for setting up the fixed IP Address.

    DHCP range

    Again the actual place to find this will depend on your router but generally you will find the DHCP settings under basic setup or network settings.

    On the right is the DHCP setup section on a linksys routerDHCP sample. the Starting IP Address is 192.168.1.100 and the max number of users is 50 that means the DHCP range is between 192.168.1.100 and 192.168.1.150.
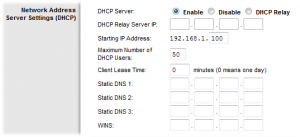
    So any Fixed IP addresses will need to be higher or lower than that range, I would suggest using the IP’s between 192.168.1.49 and 192.168.1.99 for equipment requiring a fixed IP address.

    Setup Fixed IP

    1. Navigate to SYSTEM > OpenELEC.
      • If  you want to setup a fixed IP for the build-in network socket on your PI select Network 1.
      • If you want to setup a fixed IP for a secondary network interface i.e. a wireless dongle select  Network 2.
      • For instructions on setting up Wifi see our recent post here.
    2. In the selected Network tab,
      • Move down to Static IP address and press enter
      • now enter the information you got earlier.
        • Enter the Fixed IP address you would like the PI to use.
          • This should be outside of your Router / Access Points DHCP range.
        • Enter the Subnet mask
        • Enter the Gateway IP – this will be the IP address of your router.
        • Enter the DNS server 1
        • Enter the DNS server 2
      • Click Save.
    3. Reboot your pi.
    4. Go into SYSTEM > System Info > Network and check that the PI has connected to your router / access point and is connected to the internet.
    5. Thats it …….


    If it does not work check you setting and make sure you have rebooted your machine, if it still does not work you may need to use an external USB powered hub as your WiFi dongle may require more power than the Pi’s USB ports can supply.

    If you would like help with your Raspberry PI, computer or laptop then please contact us or visit our IT Support Page.

     
  • VennerCorp 12:05 on May 19, 2013 Permalink |
    Tags: , , OpenELEC,   

    How do I setup Live TV on OpenELEC?

    Below are some basic and straightforward instructions to get Live TV set-up on your Media centre, computer or Raspberry PI in just a few minutes.

    How to setup Live TV on OpenELEC

    How do I setup Live TV on OpenELEC?

    The below instructions assume you have a media box, Raspberry PI or pc etc setup with OpenELEC Frodo or later and have a Linux compatible TV tuner card or usb stick connected.

    If you live in the UK and want HD freeview channels I would recommend  the USB plugin “PCTV NanoStick PCTV Systems DVB-T2 290e nanoStick HD TV Tuner” this is made by Pinnacle / Hauppauge (note – OpenELEC will recognise it as a Sony CSD282, but this is ok)

    Just follow the below guide to get it up and running;

    1. First you must install the Backend server – this is what controls the TV tuner card, grabs the channel etc ….
      • This add on needs to be installed from with in the XBMC Add-on Manager
      • Go to – Settings > Add-ons > Get add-ons > OpenELEC Mediacenter OS Add-ons > Services
      • Select tvheadend
      • Click Install
      • Reboot your machine.
    1. Second you need to install the front end
      • Go to – Settings > Live TV
      • Select Enabled.
      •  A small message box will appear telling you need to install at least one PVR Client
      •  Select OK.
      • Scroll down the list and select “tvheadend”
      • Click Enable.
      • Go back to the home screen
      • Reboot the machine.


    2. Last you need to setup your tuner card on the backend server – this is done via a web interface.
    • From within a web browser type in the following changing the “ipaddress” for the address of the device running OpenELEC  http://ipaddress:9981 e.g. http://192.168.1.2:9981
    • You are should now see the following interface.OpenElec Live TV
    • Go to > Configuration > DVB Inputs > TV Adaptors.
    • Select the drop down menu and choose your TV tuner.
      • Enable “Autodetect muxes” and “Idle scanning”
    • Click Save.
    • On the left you will see a button marked “Add DVB Network by location”. – Click it
      • Select your country
      • Select the Transmitter that is nearest for you.
      • Click ”Add DVB Network”.
      • Wait for “Muxes awaiting initial scan” to become 0
    • Click the “Map DVB services to channels” button.
    • Click on the “channel / DVB” button, you should see a list of all the channels your box has found.
      1. If there are no channels showing give it a few minutes to finish scanning.
      2. If there are still no channels showing check that you have selected the correct transmitter.
    • If some of the channels are missing you might need to add a Multiplex manually – for example the UK crystal palace transmitter is currently missing the HD multiplex, you have to add this manually.
      1. Go to > Configuration, DVB Inputs > Multiplexes
      2. Click “Add mux(es) manually”
      3. Enter the details of the missing mux.
      4. Enter the Frequency of the e.g. for the crystal palace HD multiplex enter 546000.
      5. Leave all the other options as Auto.
      6. Click add.

    Reboot the machine.

    That is it, your device should now be up and running if you go to to your home screen you should see a Live TV button –  go into this section to watch live tv or setup recordings.


    For more Tutorials and Hints & Tips on OpenELEC or the Raspberry PI check out our Raspberry PI Blog Section

    If you would like to Buy a Raspberry PI, its accessories or software check out our –

    If you would like help with your OpenELEC, Media Centre, Raspberry PI, computer or laptop then please contact us or visit our IT Support Page.


    • matt 21:08 on April 17, 2014 Permalink

      What tv tuner did you use?

    • VennerCorp 21:09 on April 22, 2014 Permalink

      I would recommend a USB stick PCTV Systems DVB-T2 292e nanoStick HD TV Tuner its currently about £54 on amazon.
      Works very well and gives a great HD picture.

    • Andy 18:55 on June 10, 2014 Permalink

      Hi,
      You recommend the nanStick 290e at the beginning but then refer to the 292e which I’m lead to believe is a tripleStick and the Linux drivers are not in the current kernel as they are under development.

    • VennerCorp 20:51 on June 10, 2014 Permalink

      Yes, you are right, Amazon has updated their product listing.
      You need to get the 290E not the 292E, which as of writing is not supported on the current linux kernels.
      They are under development and should be available in Kernel 3.16 and greater or for separate download soon.


Tailored Technological Solutions

© Copyright 2000-2022 Venner Corp

Coverage Areas

We have customers all over the world, but our onsite work is centred on the south east of the UK, specifically - London, Berkshire, Surrey, Hampshire,Guildford, Camberley, Woking, Windsor, Ascot & Sunningdale.

[Custom Software] [Audio & Video] [Computer & Network Installation] [Web Site Design & Creation]
[Help & Support] [App Warehouse] [Online Shop] [Divisions] [Utilities] [Contact Us] [Accessibility] [Privacy] [Sitemap] [Links]

Hampshire ● Surrey ● Berkshire ● GU24 ● Guildford ● Woking ● Staines